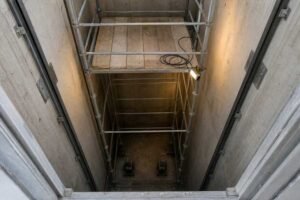
An elevator goes in as five stages: shaft ready, setting out, rails, car and machine, then suspension, wiring and commissioning. In a house the last four take two to five days. In a building they take weeks, because the shaft work and the inspection come on top.
The stage that usually decides the date is the first one, and it happens before any hardware arrives.
The Short Answer
How is an elevator installed, in the order it actually happens?
One. The shaft is finished to the drawing: net width and depth, pit depth, headroom, a level floor at every landing, lighting, a drain, and power brought to the machine position.
Two. A plumb line goes down the shaft and a setting-out frame is fixed at the top. Every later dimension is taken from that line, which is why it is done before anything heavy arrives.
Three. Guide rails are bracketed to the walls and aligned. Nothing else can be positioned until the rails are right, because everything that moves rides on them.
Four. Landing doors and frames, then the car sling and platform, the counterweight, and the machine on its beam.
Five. Ropes or belts, travelling cable, wiring, levelling, test runs, and the inspection that makes the lift legal to use.
The elevator installation timeline for these five stages splits unevenly. In a house, stages two to five are two to five days of work. In a commercial building, eight to sixteen weeks per car is normal once the car is out of service, and the inspection adds days to weeks depending on the inspector’s diary.
Before the Lift Arrives: What the Shaft Needs
The shaft is a construction item, not an elevator item, and that is where most delays come from.
The elevator shaft requirements are not negotiable and not approximate. What has to be true before installation starts:
- Net width and depth match the general arrangement drawing, within the tolerance printed on it
- Pit depth and headroom match the same drawing
- Walls plumb enough to take rail brackets without packing beyond the permitted thickness
- A level floor at every landing, with the finished floor level known and marked
- Pit waterproofed, with a drain where the local code asks for one
- Elevator pit lighting requirements met: permanent light, and a socket for tools
- Shaft ventilation adequate for the machine and for anyone working inside
- A supply of the right size and phase at the machine position
- Safe access, and a route for crates and rails to reach the shaft
Each of these is cheaper to fix before the lift is ordered than after. A shaft that is 20 mm narrow is a shaft that will not take the car that was specified. The same applies to pit depth: the pit depth requirements come from the car height and the buffer stroke, so a pit built short cannot be corrected by adjustment.
The residential elevator shaft requirements are usually simpler than commercial ones, but the list is the same and the consequences of missing an item are the same. This is why the answer to how is an elevator installed usually begins with a builder rather than with a lift fitter.

Can It Go Into an Existing House
Usually yes, and the answer depends on where a shaft can go rather than on the lift.
Three routes exist. A shaft built inside the house, in a stairwell, a cupboard or against an outside wall. A shaft added to the outside of the building, which avoids losing floor area but needs planning permission in most places. And a self-supporting cabin that stands in a room and needs no shaft at all, which is the answer where nothing else fits.
The question can an elevator be installed in an existing home is therefore mostly a question about the floor opening, the headroom above it, and whether a machine can be carried in through the house. If you have ever asked how to build an elevator shaft in an old building, the sequence is: find the opening, check what is above it, check what is below it, then check the route in.
Home elevator installation is short on site and long before it. One to three days for the mechanical assembly, one to two for finishing and adjustment, and the rest of the calendar spent on the drawing, the approval and the manufacturing lead time.
Setting Out, Then Rails
The setting-out frame is a temporary steel or timber frame fixed at the top of the shaft, carrying the plumb wires. Its position defines the centre line of the car, the rail faces and the door openings.
With the lines hanging, the rail brackets go on: drilled, fixed and packed to bring the rail face to the line. Then the rails are lifted, jointed and checked for plumb in both directions.
Two things are worth knowing as an owner. Rails are checked with a wire and a gauge, not by eye, and the record of that check belongs in the handover file. And the rail alignment is what the car rides on: a lift that feels rough at one floor usually has a rail problem at that floor rather than a machine problem.
Doors, Car, Counterweight, Machine
Landing doors and frames come next, set to the same centre line, with the sill level with the finished floor.
The car goes in as a sling first: two uprights, a crosshead and a platform, assembled in the pit or on the lowest landing. The car walls, ceiling and floor finish follow once the sling is on the rails. If you have seen an elevator installation diagram, this is the moment it starts to look like a lift rather than a set of parts.
The counterweight frame and its fill weights go in on their own rails. The machine is lifted onto its beam, aligned to the plumb lines and bolted down. The elevator installation drawing will show a tolerance for that alignment; it is small, and it is checked rather than assumed.
This is the stage a building notices: crates in the lobby, a scaffold in the shaft, noise that travels.
Ropes or Belts, Then Wiring
With car and counterweight in place, the suspension goes on: ropes reeved over the sheave and terminated at both ends, or belts laid on the sheave and tensioned to equal readings.
Then the travelling cable, the shaft wiring, the landing call circuits, the car operating panel and the safety circuits. Electrical work is where most of the commissioning time sits, because every safety circuit has to prove itself before the lift will run at speed.
Levelling, Test Runs and Inspection
The lift is then run slowly, floor by floor, and the levelling adjusted so the car floor sits level with each landing. Door operation is set, and the safety gear, buffers, overspeed governor and emergency systems are tested.
The last step is the inspection by the authority or its inspector. Nothing may carry passengers before it passes. The handover file should contain the drawings, the test records, the rail and rope certificates, the maintenance instructions and the inspection report.

Who Does What
Delays are rarely technical. They are a gap between two parties who each thought the other had it.
| 品目 | Building side | Lift side |
|---|---|---|
| Shaft, pit, headroom, openings | はい | いいえ |
| Shaft lighting, drain, power to the point | はい | いいえ |
| Landing finishes around the door frame | はい | いいえ |
| Scaffold in the shaft | Depends on the contract | Depends on the contract |
| Rails, doors, car, machine, wiring | いいえ | はい |
| Commissioning and test records | いいえ | はい |
| Inspection attendance | Usually the building side pays | The lift side attends |
The two rows that cause the most argument are the scaffold and the landing finishes. Both are worth writing down before work starts.
What to Check at Each Stage
Anyone still asking how is an elevator installed has usually not seen the site divided between two trades. The elevator pre installation checklist matters more than the final one, because everything after it is a consequence of it.
| Stage | What you check | What it prevents |
|---|---|---|
| Shaft handed over | Net sizes, pit depth, headroom, level landings, power | Equipment that does not fit, or a shaft rebuilt at your cost |
| Setting out | Plumb lines recorded, frame position signed off | Everything downstream in the wrong place |
| Rails | Plumb record in both directions, packing within limits | Rough ride, noise at one floor, premature rope wear |
| ドア | Sill level with finished floor, gap uniform | Trip hazards and door faults that return for years |
| Car and machine | Machine alignment to the lines, bolts torqued | Vibration and one-sided sheave wear |
| Suspension | Rope or belt tension equal, terminations correct | Uneven wear and early replacement |
| Commissioning | Levelling at every floor, all safety tests recorded | A lift that passes but does not feel right |
| Handover | Full document set, inspection report | No record when something goes wrong |
An elevator installation checklist is only useful if it names who signs each row. Without that, it records what happened rather than who is responsible.
What to Ask Before You Sign
Four questions, all answered on paper.
Which items in the shaft are mine and which are yours, item by item?
What tolerance is the shaft being measured against, and who measures it?
Who provides the scaffold, and who removes it?
What documents will I hold at handover, and who keeps the test records?
The answers turn a vague programme into a list of dates with names against them. That list is what you will use when something slips.
LJ Elevator covers every stage of the job: the equipment, the drawings, the shaft check before anything is ordered, support during installation, and spare parts afterwards.
If you are planning a new lift, modernising an existing one, or still working out whether a shaft is possible in your building, send us what you have — dimensions, photographs or a sketch — and we will come back with the sequence, the dates, and a clear line between your work and ours. Reach the team through our contact page.